Thứ Ba, 3 tháng 6, 2014

Working with Photoshop Color Range


Photoshop Color Range Command


Photoshop guys are very familiar with the color range option of Adobe Photoshop. Color range command is a great tool for selecting the areas of an image based on sampled color. And it's somewhat similar to Magic Wand Tool. In Magic Wand Tool you need to manually click on the areas of an image that needs to be selected. But if you use the color range option, you just need to choose the sample color. And Photoshop will make the selection by itself! 


This tutorial applies to all running versions of Adobe Photoshop including CS4, CS5 and CS6. But I've prepared the tutorial using Photoshop CS5. All the images of this post will be based on Photoshop CS5. 


Color Range

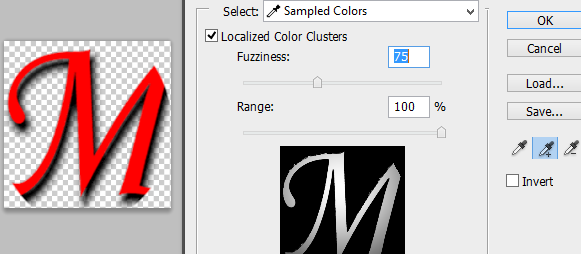
Color Range belongs to the Selection part of Photoshop. You will find it under the Select Menu. Run Photoshop from your PC > Open an image from your hard disk > Go to the Select menu > Choose Color Range. You will get the following image: 


Color Range Window in Photoshop CS5


Have you noticed Marks PC Logo on color range window? Here the white part is currently selected. If you would like to expand the selection area then click on the pencil button from the right side with plus mark. Now go to your image and hit on the part that you want to add to your selection. 


Make sure Sapmled Colors is enabled in the Select option. 


You can also increase/ decrease the amount of Fuziness adjust the selection. If you make any wrong selection or if you'd like to remove something from your selection then choose the Pencil button with negative sign. Then hit on the part of image you want to deslect. 


Eyedropper Tools

The three tools just below the Save button is know as eyedropper tools. The left one is called Eydropper, middle one is Add to Sample and the right one is Substract from Sample


Fuziness and Range

I've told earlier that Fuziness will control the amount of selection. By increasing and decreasing the range, you can control the amount of selection. And Range will control how much area of the image will be selected. 


To be honest, color range command is somewhat difficult to explain. You need to practice it by yourselft. If you click on the options, increase or decrease the value of different fields, you can easily understand. So, try to explore! 


Stay with Marks PC Solution to get more interesting IT topics!


Nhãn: , , , , ,

Thứ Ba, 13 tháng 5, 2014

Working with Photoshop Stroke


How to Apply Stroke in Photoshop


Photoshop Stroke belongs to layer style. You can add stroke outside of an image, text or shape. When you apply stroke over something, it looks like a border or outline. You can also choose different colors for stroke. And you can also adjust the size, position and opacity while applying stroke. 


Last month I wrote about how to work with Fill & Opacity in Photoshop. I think you should also have a look to this tutorial. It will be helpful for you. 


Photoshop Stroke

Look at the two images below side by side. The left one has no outline. But the right one has a border outside of it. 

Photoshop Stroke Effect


No stroke has been applied on the left image. And the right image has a stroke outside of it. You can also use stroke with texts and shapes. Stroke can highlight something. Sometimes after applying stroke over something, you can minimize the fill. In that time, you will get stroke highlighted and the inside dimmed! Learn more . . . 


How to Apply Stroke?

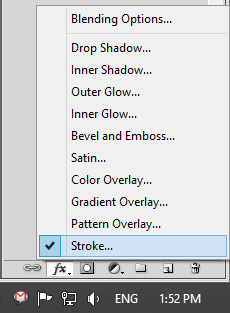
If you wanna apply stroke over an image then open it. Or create a new document and then type something or take any shape on which you wanna apply stroke. Now make sure you're on the right layer I mean your image or text is selected. Also make sure that your Layer window is turned on. Now go to the strong as shown in the image below. 


Strok Option in Adobe Photoshop CS5


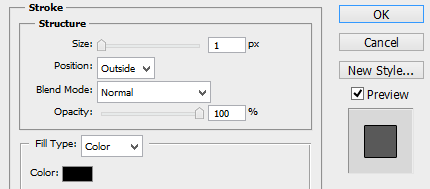
Hit on the fx (Add a layer style) at the end of layer panel and choose Stroke. Now you will get the Layer Style window. Look at the Stroke options below:


Stroke in Layer Style Window


Adjust the size and look at the effect of your stroke outside the image or text. This is very important. Sometimes 1 px doesn't make any sense. Though it depends on the situation I prefer 2 or 3 px. Certainly a fat stroke will not make any sense. 


Keep Position - Outside, Blend Mode - Normal, Fill Type - Color and Opacity - as your wish. If you minimize the opacity from 100% to 60 or 70%, then your stroke color will be darken somewhat. 


And finally choose a brilliant color for the stroke. Hit on the color box and select different colors to test the result. After choosing the color, hit on the OK button. 


You can also explore some additional options from Layer Style window. Suppose Drop Shadow, Gradient Overlay, Satin, Bevel and Emboss these are really cool options here. These can turn your normal image into an outstanding one. And these are really awesome for creating superb text! 


After applying stroke, also adjust the Fill and Opacity of the layer. These control the transparency of your image. Adjusting the transparency will give you a completely different look. 


Stay with Marks PC Solution to get more interesting IT topics!


Nhãn: , , , , ,

Thứ Bảy, 10 tháng 5, 2014

Create Sample Barcode using Photoshop !!


How to Create Barcode using Adobe Photoshop


In this post, I'm gonna publish a funny tutorial of Adobe Photoshop. Now I will show you how to create a sample barcode (fake) by Photoshop. It will not be a real one but look like an original barcode. And maybe all of you know that original barcodes are machine readable. A real barcode includes product information like country of origin, manufacture and expiry date etc. 


I'm using Adobe Photoshop CS5 for this tutorial. But so far I know, any version of Adobe Photoshop will produce the same result for you. Okay let's start - 

  • Run Adobe Photoshop and open a new file with following settings
  • Choose Width 250 px, Height 100 px, Resolution 72, RGB Color Mode with 32 bit, White Background and hit OK. 
  • Now you will get a white rectangle in the screen. 
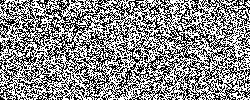
  • Go to the Filter Menu > Noise > Add Noise . . . > Amount 400 > Distribution - Gaussian > Select Monochromatic > Hit OK. 
  • You white rectangle will take the following look. 

Noise Filter in Photoshop


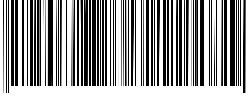
  • Again go to the Filter Menu > Blur > Motion Blur . . . > Angle - 90 degree > Distance - 999 pixels > Hit OK. 
Motion Blur after Noise Filter
  • Look, I've just cut the bottom part of the image with Rentangular Marquee Tool. Choose Rectangular Marquee Tool from the toolbar. Now click and drag as my image shows above leaving a small portion from left and right part. Hit on the delete button and choose white color. 
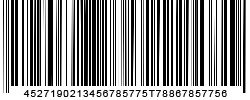
  • Press T or simply open the Type Tool > Choose Arial font with 10/12 pt size > Type some digits randomly as below.

Sample Barcode by Photoshop


We're almost done. But you can't save it! Because at the very beginning, you chose 32 bit color mode. But if you want to save the image as JPG or PNG, you must select 8 bit color. Then why I suggested to use 32 bit? Because 32 bit will give you a better look which 8 bit or 16 bit can't. 

If you choose 8 bit or 16 bit color, there will be no problem. You can directly save it as JPG or PNG. But the quality will fall somewhat. 


Then How to Save? 

  • Look at the layer panel. Possible there are two layers - Text and Background. Press Shift key > select both the layers > Click right mouse button > hit on Convert to Smart Object.
  • Now press Ctrl + A > Ctrl + C > Ctrl + N > In the Color Mode - Choose RGB and 8 bit > Hit OK.
  • Press Ctrl + S > Select either JPG or PNG > Hit OK.

I prefer PNG due to its brilliant quality. 


Note: If you avoid using 32 bit color mode while opening the new document you will not face any problem while saving it. Simply use 8 bit when you create the document at the beginning. Then you can easily save it just after completing the barcode. But in that case, the bars will not be so clear. 


Do you like this tutorial? :) 


Stay with Marks PC Solution to get more interesting IT topics!


Nhãn: , , , ,